This
is the index page for the Print preferences page. Here you can
choose your check style, create a new check style, set up printers and
more.
IMPORTANT NOTE: AR Now Online has been
designed to be used with Mozilla browsers. You can work in AR Now with
MS Explorer, but you CANNOT PRINT CHECKS with Explorer. Explorer
does not honor the proper margin and other settings necessary for
accurate printing of checks from the Browser. We designed AR Now
for use with the Mozilla Browser. So while you can work in AR Now
with Explorer and others, we cannot guarantee that things will display
or function properly. You can obtain the proper Mozilla Browser at the
following location:
Browser Download: http://www.mozilla.org/download.html (more info & downloads)
We recommend using the latest version of Firefox.
These are full featured browsers available for Windows, Linux, and Mac
systems and you may find yourself using them for more than AR
Now. Download and install according to the instructions.
Also in preparation for proper printing, the Mozilla browser should
have its margins set properly. To do this, first open File >
Page Setup as shown below left. Then click on the Margins &
Header/Footer as shown below right. Make sure the settings on
your browser match those shown below. (all margins = 0 and all headers
/ footers set to "none").
The Print Preferences is the main area for choosing or creating a
check style, setting up printers, getting your browser and printer
zeroed, add a printer or select from existing printers. AR Now
online
which was created by Perusion
using Interchange,
has a unique check template creation tool. There
are preset templates that take care of the work for you when you are
using checkstock supplied by us, and we believe that our check stock
offers the best value out there.
Below is a screen shot with specific operation areas labeled with
numbers. The corresponding explanations for each area are listed
below.
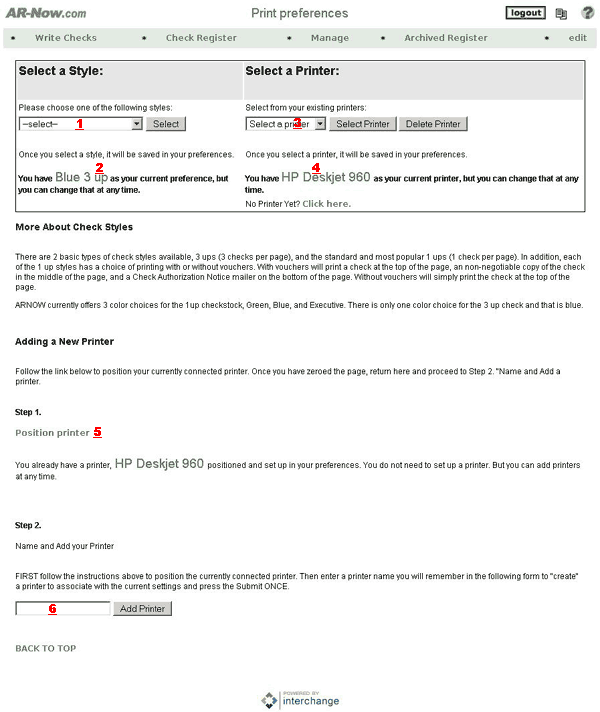
The Print preferences page
is really quite simple. You can pick a check style to match the
checkstock you are using. You can select a printer that you have
set up previously, or you can set a printer up to work with the
program. Before you can use a printer, you must set it up.
We will address the numbered items on the page shown above next.
Select Check Style
- Here you can select what type of
checkstock you are using, and whether or not you would like to have the
1 ups printed with vouchers. Most of the existing AR Now
customers will be familiar with the checkstock choices, 1 ups in
Green, Blue, and Executive, and 3 ups in Blue. The 1 ups can
print with or without vouchers. The vouchers will include the
standard check at the top of the page, a non negotiable copy of the
check in the 2nd position, and a mailer receipt in the 3rd position
that has been pre-formatted to work with most invoice window
envelopes. Once you select a style, it will be saved in your
preferences and you will not have to select it again, unless you
want to use a different style.
Your Current Style
- The current style in your
preferences will be displayed here. In the example, the Blue 3 up check has been selected and is
the current style that will be
printed.
Select / Delete a
Printer - Here is where you will
select the printer that you want to use to print checks. Before
you can select a printer, you will have to set one up. That
process is described here. Once you have one or more printers in
your selection you select one by simply selecting it from the dropdown,
then click on the
button.
Your printer will then be saved in your preferences, and you will not
have to select it again, unless you
want to use a different printer. To delete a printer, simply
selecting it from the dropdown,
then click on the button.
This will remove the printer from your selection list. You can
always set up as many printers as you need.
Your Current Printer
- The current printer in your
preferences will be displayed here. In the example,
the HP Deskjet 960 check has
been selected and is the current printer that will be used.
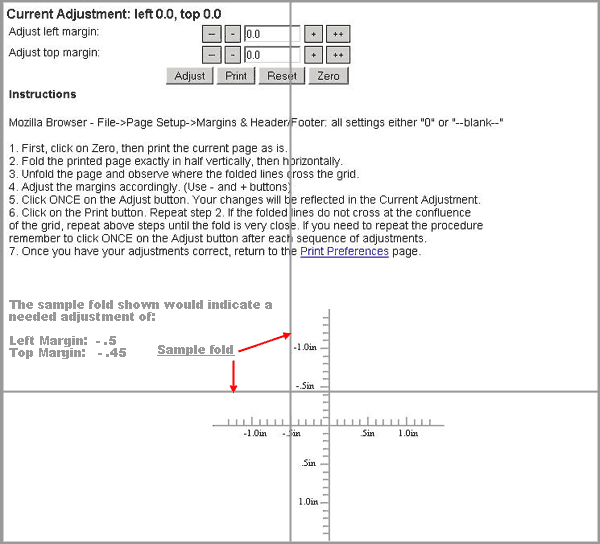
Position Printer -
This is a link to the page
shown below. Here you will position the program relative to your
individual printer. Because everyone has a different set up, we
have to enter adjustments to the program in order to print the checks
in the proper location. The way we accomplish this is by printing a
scale on the paper, and then folding the paper to see where on the
scale your printer is printing. We have put a simulated fold on
the display of the page below, to illustrate how to adjust to the
fold. The example fold crosses the horizontal (left) margin line
at approximately -.5, and crosses the vertical (top) margin line
at approximately -.45. So in this case we would click the
Adjust Left margin tenths button 5
times until
-.5 was in the window.
Then we would click the Adjust Top Margin tenths button 4 times, and the Adjust Top Margin hundredths
button 5 times
until -.45 was in the window. Once we have the proper numbers in the
window, we click on the Adjust Button. Then click the Print
button to test your adjustments. Once you have the adjustment
correct, click on the Print Preferences link to return to the print
preference page. ADDITIONAL INFO: The Reset Button simply
resets the numbers in the boxes. The Zero button will RESET the
current adjustment that has been entered using the Adjust Button.
The Current Adjustment is cumulative. For example if you set it
to -.5 and -.2 and then printed and found out you did not move it quite
enough, the next time you could adjust by a small amount, click the
Adjust button and the amount would be ADDED to the existing
Current Adjustment. The long and short of it is, make sure you have the
adjustment correct before you go back to the Print Preference page to
name the printer.
Name and Add your
printer - After you have
established the offsets for the printer you will be using (step 5) all
that is left is to associate a name with the printer. Just type a
name into the text window, and click on the button. Just use a name that is familiar for you, and
simple. In the example we have used HP
Deskjet 960, to reflect a Hewlett Packard Deskjet 960 model.
You can use
whatever you like. Finally, go back up the your select Printer list,
and select the printer you have added.