This
is the help page for the Check Edit page. The Check Edit page will come
to you in two different forms. The first form is the pre-print
form. This is BEFORE the check has been printed. Most all
of your edit options will be available to you. The second form of
the Check Edit page will be the post-print form or AFTER you have
printed the check. Very few of the edit options are available after the
check has been printed.
The Check Edit page (pre-print) will allow you to change most anything
you originally posted in the Write Checks page. This is to allow
for any mistakes or changes that may have occurred between the time you
wrote the check and the time that it is to be printed. With AR
Now Check Scheduling, you may in fact write checks MONTHS before you
actually print them. So changes can occur.
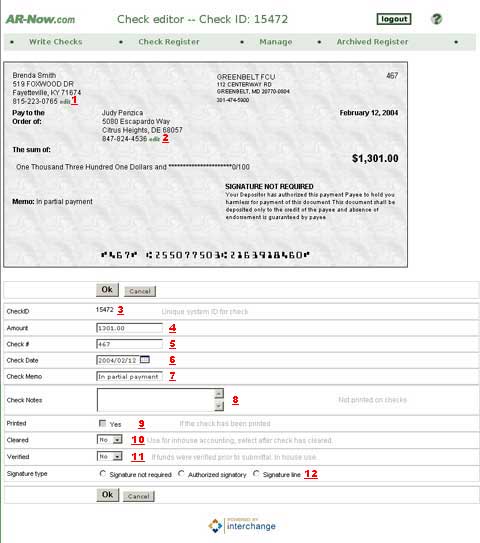
Below is a screen shot with specific operation areas labeled with
numbers. The corresponding explanations for each area are listed
below.
The first two editable fields are located on the check image shown
above. All of the other fields will be found below the image, in the
edit check form....
Edit Payor - The
small "edit" link next to the payors name (located on the check image)
can be clicked and this will open a small pop-up window in which to
edit the payor. It can be seen here. It will have the normal
fields, Name, Address, City, State, Zip, Phone, Account # and will also
allow you to chose or change a bank for the payor.
Edit Payee -
There is a similar small "edit" link next to the payees name (located
on the check image) can be clicked and this will
open a small pop-up window in which to edit the payee. It can be
seen
here. It will have the normal fields, Name, Address, City, State, Zip,
Phone.
CheckID -
The first field is not actually editable. It is the CheckID. It
is simply a unique system assigned number to reference the check with.
Amount - This
is the amount of the check. You can put any appropriate integer
into this field. You do not need to enter commas, or $ signs. If
the amount contains cents you must use a decimal, for example 3482.25.
Check # -
This is the number that the payor has given you for the check.
The payor will generally record this number in his or her check
register, just as if they had written the check themselves. (This is
different from the CheckID which is a unique system assigned
number. You may have 1 or more check numbers that are the same,
but you will never have 2 identical CheckID's.)
Check Date -
This is the date the check was created on, or the date it is intended
to be used on. Be careful editing this field if you have set up
recurring payments!
Check Memo -
The memo that will be printed on the check. Usually this will be
the reason the check was printed, such as "Payment on Car, Monthly
Rent" and so on.
Check Notes -
Notes for the check. These WILL NOT be printed on the check and
are intended for the user of the AR Now program. You may have
notes regarding the Payor, the Payee, the nature of the payment, and so
on that may be convenient in the future to look back on.
Printed
- This is simply a check box that will reflect the status of the check,
Printed or not printed. It is greyed out and cannot be changed.
It is
simply a reference for your use.
Cleared
- This is a field for the user of the AR Now program, use this field to
mark the check as cleared once it has been cashed and cleared the bank.
NOTE: This is one of
the few fields that CAN be edited AFTER the check has been printed.
Verified -
This
is a field for the user of the AR Now program, use this field to mark
the check if you verified with the bank that the account was valid and
that the funds were there prior to check submital. NOTE: You can use this Yes or No field for
anything that applies to your particular needs.
Signature Type
- This field will decide what
signature type is printed on the check. You will have 3 choices.
The default is Signature not required. The other two choices are
Authorized Signatory and the standard Signature line. For more
information regarding these choices click here.
Buttons
Use
the OK Button to submit your edits to this check. If you have
chosen more than one check to edit, this will submit the current check
and load the next check in line.
The
Cancel Button will simply cancel the operation and return you to the
previous page. If you have selected multiple checks to edit this
will still cancel the entire operation and return you to the register.
The
Delete Button will delete the current check. NOTE: This operation
is PERMANENT. There is no recovering if you delete a check.