The check Register is the main working area for working with existing
checks. Whether it is editing existing checks, printing checks,
deleting checks, archiving checks, or even creating a new check
based on an existing check, you can do it here. AR Now online
which was created by Perusion
using Interchange,
uses an extremely efficient technique for the manipulation of multiple
records. You first select the records you wish to work with, then
proceed with the operation automatically. The selection procedure
is the same whether you are editing or printing checks. This
allows for a quick learning curve for all operations. In fact, the ONLY
singular procedure on this page is Copy Check as new. You can
only select one check at a time to copy. Other than that, all
operations can be performed on multiple checks.
Below is a screen shot with specific operation areas labeled with
numbers. The corresponding explanations for each area are listed
below.
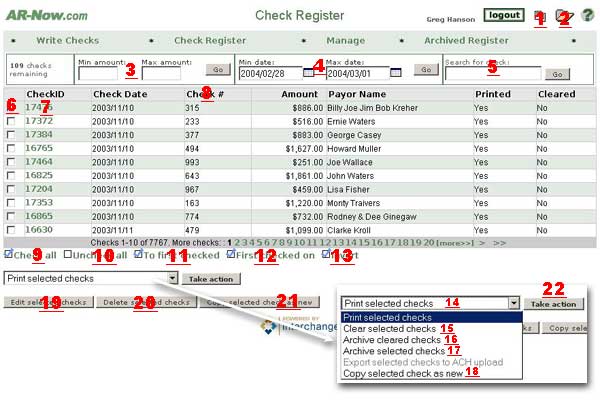
- Page Preferences
- This link
 will take you to a page where you can set the preferences for the
current page. On the register page you can determine which columns you
would like to display, how many rows you would like to display, and
more. For more information, click here.
will take you to a page where you can set the preferences for the
current page. On the register page you can determine which columns you
would like to display, how many rows you would like to display, and
more. For more information, click here.
- Search Panel -
The folder icon represents the search panel status. If the folder
is open,
 , items 3-5 will be
displayed along with the checks remaining window on the left. If
the folder is closed, , items 3-5 will be
displayed along with the checks remaining window on the left. If
the folder is closed,  ,
these items will be hidden. ,
these items will be hidden.
- Min / Max Amount -
These windows are part of the Search Panel. Enter in a minimum
and maximum amount if you want to limit the display of checks by amount.
- Date Range - There
are two date range windows, a min date and a max date. Simply
select the starting and ending date range for the checks you wish to
display and click on the Go button. All checks within the
selected date range will be displayed.
- "Search for" Box - Simply
enter any information into the search window and click go. All
related checks will be displayed. This search is very powerful, so you
can normally return as many or as few records as you like. For
example, if you type "son" into the window, you will return all
"Johnsons, Andersons, Nelsons as well as Sonny, Sonja, and any other
words containing "son". If you want less results, be more specific. You
can also type in a check number or amount, but again keep in mind how
the search works. Be specific for fewer results, vague for more.
- Select Boxes
- This left-most column containing
checkboxes is the heart of the multiple selection capability of the
check register. To select checks for edit, simply put a check into the
box next to the check that you want to edit. You can select as
many checks as you like for all operations EXCEPT Copy selected Check
as New. For that operation you can only select 1 check at a
time. There are some time saving approaches to using the check
boxes, and these are explained in #s 9 - 14.
- Single Check Edit
Link
- If you simply want to edit
one check, just click on it's Check ID. This is a link that will take
you to the Check Edit page. There are two types of check edits.
One is BEFORE the check has been printed, and everything is still
editable. We have a detailed explanation of the
Check Edit Page here.
The other type of check edit is AFTER the check has been printed.
There are only a few editable items on the check after it has been
printed. That page is shown here.
- Sort
By Headers - Each column header is a link. If you click on
this
link, the Register will be sorted by that column. If you click on it
again, the Register will be sorted by that column, only in reverse.
Items
9 - 13 are all Click Savers.
What this means simply is that you can use them
instead of having to select many items individually. Each Click Saver is described below.
- Check
all. Clicking on this Click Saver will put a check mark in
front
of all of the checks currently displayed in the register. Example: Want
to clear all the checks in the register? 2 clicks will do it. Just
click this Check all button, then click on #6 Mark selected checks
cleared. All of the displayed checks will be marked as cleared.
- Uncheck all.
Yes it's obvious, does the opposite of #9, Check all.
- To
First Check. This one will place a check
mark into all of the boxes above the currently selected box.
Example, in the screenshot above, suppose you wanted to check all of
the records above Check ID 15471. First, place a check mark into
the box next to Check ID 15471. Next, click on the "To First Check"
Click Saver. Check marks will be placed in all checks above 15471.
- First
Checked on. This is just the opposite of
To First Check. Clicking this will place check marks in all boxes
BELOW the currently selected box.Example, in the screenshot above,
suppose you wanted to check all of
the records above Check ID 15471. First, place a check mark into
the
box next to Check ID 15471. Next, click on the "First Checked on" Click
Saver. Check marks will be placed in all checks below 15471.
- Invert..
This Click Saver will invert, or
reverse the currently selected boxes to not selected, and not selected
to selected. Example: Suppose you wanted to print all the checks
in the above screen with the exception of Check ID's 15475 and
15488. Simply put a check into each one of those boxes, then click on
the Invert Click Saver. All checks with the exception of the 2 you
initially selected will now have check marks. Then click on #7
Print selected checks, and you are good to go.
Items
14 - 18 are all Drop Down selections.
Rather than clutter up the screen with 6 or more buttons, we have
consolidated potential selections into a drop down window. Each
available selection is described below. After you make your selection,
simply click on the Take Action
button and the operation will be commensed.
- Print Selected Checks - Make
this selection and click
the Take Action button AFTER
you have selected checks that you want to print (described in
#1). All checks selected will be sent to the print page. Please
make sure that you have set up your printer PRIOR to printing
checks. For more information on setting up print preferences,
click here.
NOTE: You will NOT BE ABLE TO EDIT A CHECK AFTER IT
HAS BEEN PRINTED. You can create a new check, or delete the printed
check, but you cannot edit it after it has been printed. Please
keep this in mind BEFORE printing checks.
- Mark
Selected Checks Cleared - Make this selection and click
the Take Action button
AFTER you have selected checks that you want to mark as cleared
(described in #1). You can use this feature for anything you
like, but it was designed to allow an accounting method to mark checks
after they have been verified to have cleared the bank. It can
also be used in conjuction with other functions to present a clear
picture of check status. For example, suppose you have a large
register of both cleared and uncleared checks. To view all
cleared checks together, simply click on the Column Header (as
described in #3) and all of the cleared checks will be grouped
together. NOTE: If you need to change the status of a check from
Cleared back to Uncleared, you need to use the Check
Edit Page, using either #2 or #4 mentioned above.
- Archive Cleared Checks - Make this
selection and click
the Take Action button AFTER
you have marked selected checks as cleared (described in
#6) and are ready to move them to archive. This button simply moves all
checks that are currenlty marked as *cleared* to Archive. The
same rules apply as archiving any checks as described in #5,you can
always access
these checks again in the Archived Register, and if necessary move them
back from the Archive Register to the Check Register.
- Archive Selected Checks - Make this
selection and click
the Take Action
button AFTER you
have selected checks that you want to archive (described in #1).
All checks selected will be removed from the Check Register and
transfered to the Archive Register. This is an efficient way to
keep your register "uncluttered". Remember, you can always access
these checks again in the Archived Register, and if necessary move them
back from the Archive Register to the Check Register.
- Copy selected Check as New - This is
the only single
record operation on the page, meaning that you can only select 1 check
at a time to copy. Example: Suppose a regular customer calls in with a
payment. Rather than enter everything in, you can simply put a
check mark next to a previous check that was created for this customer,
and press the Copy selected Check as New button. All information
with the exception of the amount, check number, and date will be
transferred to a new check, and the Write Checks window will be opened
for you.
- Edit Selected Checks - Click this
button AFTER you have
selected checks you want to edit (described in #1) and you will be
brought to the Check Edit Page.
There are two types of check edits. One is BEFORE the check has
been
printed, and everything is still editable. We have a detailed
explanation of the
Check Edit Page here.
The other type of check edit is AFTER the check has been printed.
There are only a few editable items on the check after it has been
printed. That page is shown here. If you have selected more than one
check, after you edit the
first check and press OK, the next check selected will appear in the
edit window automatically. This will continue until you have
edited all checks selected.
- Delete Selected Checks - Click this
button AFTER
you have selected checks that you want to delete (described in
#1). All checks selected will be deleted. IMPORTANT- THIS
OPERATION IS NOT REVERSIBLE. DELETION IS PERMANENT. If you are not
sure, use Archive instead. You can always delete from there at a
later date.
- Copy selected Check as New - This is
the only single
record operation on the page, meaning that you can only select 1 check
at a time to copy. Example: Suppose a regular customer calls in with a
payment. Rather than enter everything in, you can simply put a
check mark next to a previous check that was created for this customer,
and press the Copy selected Check as New button. All information
with the exception of the amount, check number, and date will be
transferred to a new check, and the Write Checks window will be opened
for you.
- Take Action -
This button simply puts into action your selection from the dropdown
window described above.
|