The Manage Banks register is the main working area for working with
existing Banks. The Manage Bank screen displays banks which you have
chosen to work with. There are over 60,000 banks in the database,
so AR Now is set up for you to select and display only the banks you
wish to work with.
Banks are
somewhat different than Payors and Payees. Because the Banks
database is shared by all users of AR Now, banks that you
have not entered cannot be edited or deleted. Only banks that you
have entered as "Add New Bank to database" can be edited or
deleted. Banks however can be MARKED, if you believe the record
contains an error. Banks marked and notated in this way will be
reviewed on a regular basis by AR Now, and handled appropriately.
Below is a screen shot with specific operation areas labeled with
numbers. The corresponding explanations for each area are listed
below.
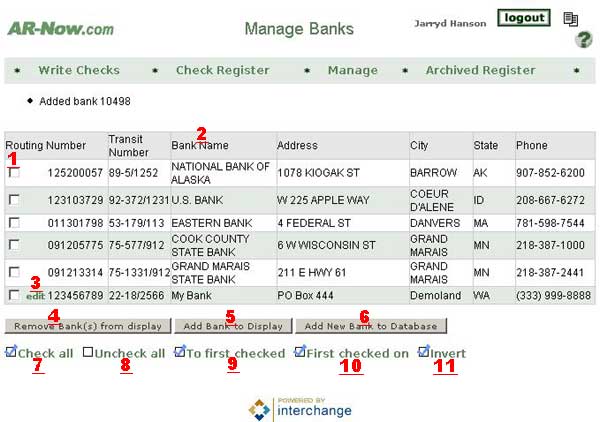
- Select Boxes
- This left-most column containing
checkboxes is the heart of the multiple selection capability of the
Manage Banks register. To select Banks for removal from the display,
simply put a check
into the
box next to the Bank that you want to remove.
- Sort By Link
- The top of each column is also a link that will allow you to sort the
table by that column. Click it twice to reverse sort.
- Single Bank Edit Link
- If
you want to edit a Bank, and it is a
bank you have created, just click on it's
edit link in the routing window. Only banks that you have entered
will display this link. Click here for
more information.
- Remove Bank(s) from Display
- Click this button AFTER
you have selected Banks that you want to remove (described in
#1). All Banks selected will be removed from the display. These
banks are not deleted, only removed from this display. You can
add banks back to the display, see below.
- Add Bank(s) to
Display - Click this button to add a new banks to the display.
A new window will pop up. Click here
for more information.
- Add Bank(s) to
Database
- Click this button to add a new bank to the database. A new
window will pop up. This will
allow you to enter a bank into the banking database. Click here
for more information.
Items
7-11 are all Click Savers.
What this means simply is that you can use them instead of having to
select many items individually. Each Click
Saver is described below.
- Check
all.
Clicking on this Click Saver will put a check mark in front
of all of the Banks currently displayed in the register. Example: Want
to remove all the Banks displayed in the register? 2 clicks will do it.
Just
click this Check all button, then click on #8 Remove Banks from
Display. All of the check Banks will be removed from the display.
- Uncheck all.
Yes it's obvious, does the opposite of #9, Check all.
- To
First Check. This one will place a check
mark into all of the boxes above the currently selected box.
Example, in the screenshot above, suppose you wanted to check all of
the records above Grand Marais State Bank. First, place a check
mark into
the box next to Grand Marais State Bank. Next, click on the "To First
Check"
Click Saver. Check marks will be placed in all Banks above Grand
Marais State Bank.
- First
Checked on. This is just the opposite of
To First Check. Clicking this will place check marks in all boxes
BELOW the currently selected box. Example, in the screenshot above,
suppose you wanted to check all of
the records below Grand Marais State Bank. First, place a check
mark into
the
box next to Grand Marais State Bank. Next, click on the "First Checked
on" Click
Saver. Check marks will be placed in all Banks below Grand Marais
State Bank.
- Invert..
This Click Saver will invert, or
reverse the currently selected boxes to not selected, and not selected
to selected. Example: Suppose you wanted to remove all the Banks
in the above screen with the exception of Bank ID's 15475 and
15488. Simply put a check into each one of those boxes, then click on
the Invert Click Saver. All Banks with the exception of the 2 you
initially selected will now have check marks. Then click on #8
Remove Banks from Display, and you are good to go.
|